
f ( 5t +/- 1) crazy hair coloring experiments
It’s Friday! For this week’s friday five things plus or minus one I give you adventures in coloring my hair without store-bought chemicals.

I’m always game to try natural solutions…
1. First, I stumbled upon a blog with instructions for dyeing your hair with tea. Black tea, for a brunette like me. http:/
I was tired of going to the salon and putting chemicals on my head. It was either let the gray come back or find another way. I wasn’t ready to go back to the gray, although I’d let it be for a long time prior to this past spring. Most of my hair is already colored. I just needed to touch up my roots. Next, I researched how to thicken it, thinking I’d cook it down to just a few ounces, thicken it up, and paint it on using the little brush that came with a store-bought box of root touch-up. That would be a better test of how well it works.
2. The next day, I thought, hey! Corn starch. I have that in my kitchen and that thickens things and shouldn’t really affect the color. Oh lordy. Heh heh. It thickened it all right. It turned it into a congealed mess the color and consistency of dried-out peanut butter. Okay, maybe a little heavy on the corn starch. I tried it anyway. Yeah… No. It wouldn’t stick to my dry hair. Just clumped up and fell off. I smushed it in there and left it for a while anyway. No dice. Should have taken pics. Use your imagination.
Meanwhile, the original instructions called for mixing sage with the tea if you have stubborn gray. Note, I refer to mine as robust. Sounds a little more positive than stubborn, doesn’t it? Maybe determined would be a better word. That’s it. I have determined gray. In the first cook, I used fresh cut sage from the garden because I have lots and it needed to be trimmed back before the winter anyway. I had nothing to compare it to the first time around, so I don’t know if this helped. For the second batch, I was too lazy to go outside and cut more fresh sage so I used dried. But that was the peanut butter batch, so again, no dice.
3. Next day, next attempt. Started with way less water, new organic black tea and fresh-cut sage. Cooked it down to almost nothing and let it cool. First, I tried adding aloe vera gel to thicken it. Didn’t work. The gel just disappeared into the small amount of tea making no discernible difference in the thickness.
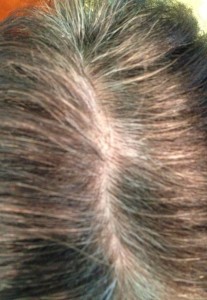 Then, I tried a little more tea with coconut oil. Problem with coconut oil is it’s solid at room temp so I heated it a little to soften it. Nope, that didn’t work either. It liquified but stayed separate from the tea just like oil and water. At this point, I tried dipping a cotton ball in the “dye” and applying it that way. The dark liquid ran into my eyes. But it gave me an idea. I soaked an old headband in the tea dye and put it on at the hair line thinking that would hold the dye against the determined gray roots around my face. left it on for an hour or so. This didn’t work either.Here is a pic of my part after these efforts. You might think the gray doesn’t look THAT determined in this pic. But, well…you know.
4. Next step, other thickeners. I looked at the ingredients on a box of root touch-up I have and found gellidiela acerosa extracts all of which are derived from algae and which I suspected might have something to do with the consistency of the mix. The first one protects the skin. The second restructures and smoothes the hair follicle, and the third–eureka!–makes a gel.
Needless to say, I don’t stock any of those products. You can order them online. But I didn’t want to wait. What I do have on hand is xantham gum. Yes, your read that right. Xantham gum is a common thickening ingredient in lots of products. You can find it at many grocery stores in the same area you’d find Bob’s Red Mill packaged flours and such. I had bought it for some previous adventure into making my own shampoo, but never used it.
What is xantham gum you ask?
You can read all about it here including learning how to make your own hair gel with it.
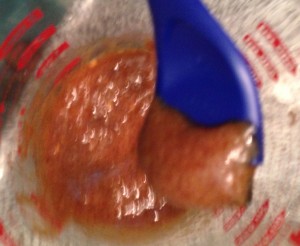
After waiting a few days, I gave this a shot. For this batch, I used SIX tea bags and fresh sage from the garden. I chopped the sage rather than throwing it in whole in hopes that would help release whatever properties it contains to help tame my determined gray. I used enough water to cover it in a small pot and set it to boil. After it cooked down, I mashed it all around to squeeze out every ounce of gray-fighting-and-covering goodness and let it cool then whisked in some xantham gum.
OH MY GOSH! This worked great to thicken the mixture. It took only a half teaspoon of xantham gum to adequately thicken a 1/4 cup of liquid. Here’s a blurry picture of what it looked like. It went on easily and stayed put. No dripping. It did appear to lighten the intensity of the color. Before adding the xantham gum, this mixture was very, very dark. Just like black tea.
This is not a mixture you could leave on overnight. It really stiffened as it dried. Because I could, I left it on for four hours then rinsed with warm water.

Sadly, not much difference to be seen.
Did I mention my gray is DETERMINED?
Here’s another pic of my part after Step 5.
Do you see any difference?
I don’t see any difference.
I would go so far as to say this pic appears to have MORE gray in it than the one before.
That’s my gray, sticking its tongue out at me.
5. While waiting for the results of this test, I researched caramel coloring. Food coloring is powerful stuff as you no doubt know if you’ve accidentally gotten some where you didn’t want it. I thought it might be worth a try either on its own or mixed with the tea. I couldn’t find it at the store. But this is easy to make. It’s just caramelized sugar. On the off chance my latest tea dye didn’t work as well as I hoped (what?? NO!!), I decided to try making a small batch.
I’ll write a separate post about this effort. Suffice it to say that nothing short of sand-blasting will make that pot usable again.
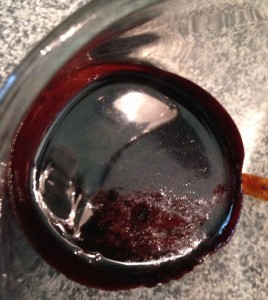
Okay, so once that cooled it was already pretty thick. Syrupy, you might say. And it smelled godawful because, well, I’d burned it. But hey, it was nice and dark!
See?
Delish.
And because I’m just as determined as my grays, I put this glop on my head.The caramel color syrup was VERY sticky. With it being so sticky, and frankly, because I was getting a little tired and cranky, I put this only on my part and around my face.
I left it on for about 2 hours. Although it seemed thick enough, it dripped. The picture at the very beginning of this post is from this experiment. But it rinsed out easily.
And this worked…
NOT. AT. ALL.
Well, there you have it my lovelies. I’m afraid it’s back to the bottle for me and my determined gray until it grows out enough to try something else. Until then, I’ll be researching.
Have you tried any natural hair coloring experiments? Have you found anything that works? Anyone tried henna? Black walnut hulls…?
5 Responses to f ( 5t +/- 1) crazy hair coloring experiments
- Pingback:Bj
- Pingback:Betsi
- Pingback:Candace
- Pingback:Candace
- Pingback:Rose M
- Pingback:Candace
- Pingback:Candace
Leave a Reply to Candace Cancel reply